Before diving into today’s Pro Tip I want to comment that with the recent availability of Power*Star units I now have 3 customers who have purchased a second P*S unit. To be sure, they are all “power users” who run multiple telescopes and therefore need multiple P*S units, but I see it as a strong vote of confidence that after using P*S for some time these users liked it enough that they wanted another one. Thank you!
My tip for today covers the Auto Dew Control feature, a very useful, but sometimes overlooked feature. The Power tab in the P*S application allows you manually switch each dew heater channel on or off and set the power level as a percentage of the max power for the connected heater. But P*S is often used in automated image capture systems, where there is not always someone around to decide when to turn the heaters on/off. You could just leave them on all the time, but this both wastes power and could result in slight aberrations caused by over-heating optical elements of the telescope. The solution is to set up and use the Auto Dew Control feature.
This feature does not determine the ideal power level for heaters, but simply turns each channel on/off based on the dew point measured by the environment sensor. Therefore, part of setting up automatic dew control is determining the appropriate power level for each heater. The objective in using a dew heater is to raise the temperature of the air right in front of the exposed objective just a bit – a few degrees C. It doesn’t matter what the absolute temperature is, and therefore you don’t need to measure how much heat is being applied. Some dew control systems do measure the temperature at the heater, and that avoids the need to determine the power level manually, but since there is a linear relationship between the power level and the temperature rise (delta T), it is not necessary to make this measurement – we can set the power level based on experience (possibly including manual measurements of delta T). As long as the heater element and mechanical properties of the telescope do not change, a given power level will always produce the same delta T.
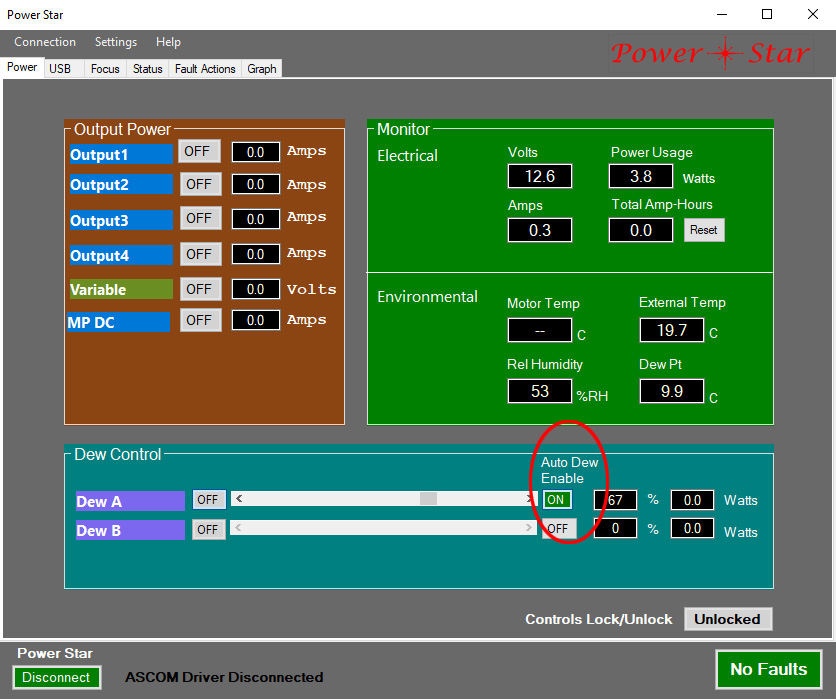
To set the power level for each channel, toggle the on/off button at the left end of each slider to the ON state, then drag the slider to the desired power level. The control is simply a percentage of maximum, but you can see the actual power level for each channel in watts to the right of the slider. Note that the wattage is dependent on both the current (as modulated by the power level slider) and the input voltage, so it will vary a bit if the input voltage changes, such as when battery voltage level drops with discharge. The wattage is calculated once per second, but it may take several seconds for the display to update, so use the percentage level first, then verify the wattage. Once you have set the power level, click the Auto Dew Enable button for the channel. While this button is ON control of the heater channel is determined by the trigger level.
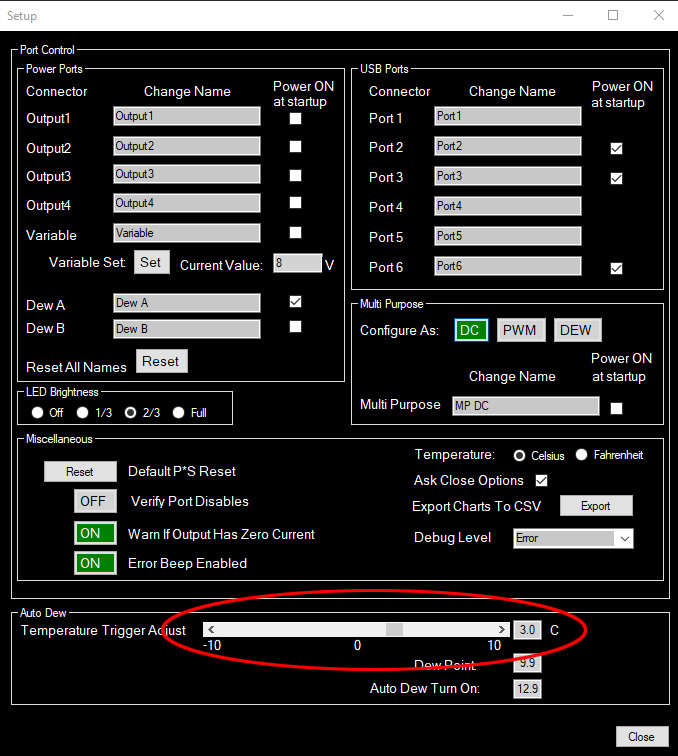
The trigger level is set in the Settings>Setup Power*Star menu, using the slider at the bottom of the dialog box, “Temperature Trigger Adjust”. The slider sets the difference between the dew point and the trigger point, so it is a relative amount, not an absolute temperature. The default setting is +3 degrees C, meaning that if the current temperature is less than 3 degrees above the current dew point, the dew heaters will be turned on. This default value of +3 degrees C is theoretically a good choice, so you may never need to change it, but a good range of adjustment is provided (including negative values) so that you can compensate for errors in the dew point measurement if needed. In most cases the measurement will be within 1 degree of the correct value, so no compensation is needed.
Note that you can change the trigger level independently of the Auto Dew Enable – it doesn’t matter which is done first.
I wanted to include a “wizard” in the P*S app to help you calculate the power level, based on the wattage of your heater and the mechanical properties of your ‘scope, but this turns out to be a pretty complex calculation, so there wasn’t time add this feature. The key parameters (after the heater wattage) is the diameter of the dew shield, its thickness, and the material it is made from, but there are many other, smaller factors that can make a significant difference. Ultimately, the best thing you can do is actually measure the delta T by measuring the temperature inside the dew shield after leaving the heater on for 20 minutes or so, and subtracting the ambient temperature.